If you are comfortable using GMAIL as your default web based email service then you can continue to use that to read mail for up to 25 other accounts.
Everything to your secondary email accounts will behave independently. For example, if you have [email protected] as your primary Gmail account, you simply log into that. If you have a business email you can set that up within the gmail account and all mail to your business account gets replied to from that business account. The ONLY issue with using Gmail as the sending account is that your sent items get stored within Gmail rather than in the IMAP Sent folder. What does this mean? It means that if you have a shared email account, meaning more than 1 person is using the email or if you are going to hand on the email address to someone in the future, the sent history won’t be with the email where if you set it up as an IMAP account in Outlook, the inbox, the sent, the folder structure etc all stay with the account.
Don’t care. It’s just you using the email account anyway… ok, let’s get started.
- Login to your gmail account.
- Click on the gear icon in to top right corner

- Click on SETTINGS
- Click on Accounts and Import
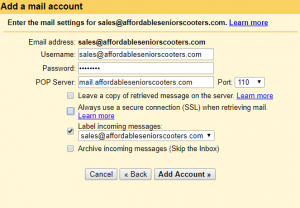
- Click on Add Mail Account and enter the email account
- in most cases you have to select to import emails from my other account (POP3) – Gmailify is changing that for IMAPs in the future but for now this is what we need to do.
- enter your credentials like below:

- follow through the prompts – tick Treat as an Alias.
- when configuring the sending mail account be sure to enter your username as the full email address again and ensure the outbound smtp is “mail.domainname.com” – note the “mail.” before.
- then verify the account. You can verify the account by logging into webmail.
- go to www.mydomain.com.au/webmail
- enter your email address and password then got into HORDE.
- there should be an email in there for you to action that you simply click on the link and you are now verified to send out from Gmail for that account.
There are other options within GMAIL that you can set up the default account, set up signatures, set up folders, labels and heaps more. If you need help setting thing up please contact us. We charge an hourly rate for our services but we can get everything set up for you.
