We have often been asked how to add images to a Joomla web page, how to move them around from left to right so the text flows around them and how to get some spacing around them. One of the questions rarely asked is what is the best practise for search engine optimisation, page loads speeds and so forth. Here are a couple suggestions.
First, best practise for adding images to a website for search engine optimisation. This is really important so I want to start here.
When naming an image, lots of people download their images from cameras or from the net and they are named, p8-14544.jpg or 23124124.gif, I am going to suggest a simple strategy to that will help you optimise your images for searches and make it easy for you to find them in the future. If you are created an article for a jewellry site here are some strategies.
- Open the image in a program that will allow you to reduce the image and save it for web. (I use Photoshop)
- Ensure the size of the image works for your page, lots of images you will download from cameras or phone will be over 2000px wide. This is MASSIVE. These will be large files and they will cause your page to load slowly (which search engines don’t like). Reduce the image to a managable size (I recommend 800px wide or less depending on what you are using the image for).
- Save for web – in Photoshop you have the option in File to Save for Web. Other image software will have a similar function, if you don’t have this option, you will want to ensure your images are smaller, perhaps no larger than 400px wide so that they will be smaller in kilobyte size. Using a program like Photoshop will take an original image that is 350KB and 800x400px down to anywhere from 20-50KB or smaller when you save for web.
- When you are saving NAME THE PICTURE appropriately.
- Considerations for naming the picture are:
- What is the name of the page, name the images for the page to help ket keywords into the page.
- The example was a jewellry website, if you are on a page for bracelets, name the image “hand-made-bracelet.jpg”. If there is more than one picture of a bracelet, name them more specifically, “hand-made-bracelet-gold.jpg” or “hand-made-bracelet-jade.jpg” or “hand-made-bracelet-beads.jpg” or put your inventory number at the end, “hand-made-bracelet-144-1.jpg”
- NOTE: I have used all lower case
- NOTE: I have not put spaces between the words – use dashes or underscores
- Considerations for naming the picture are:
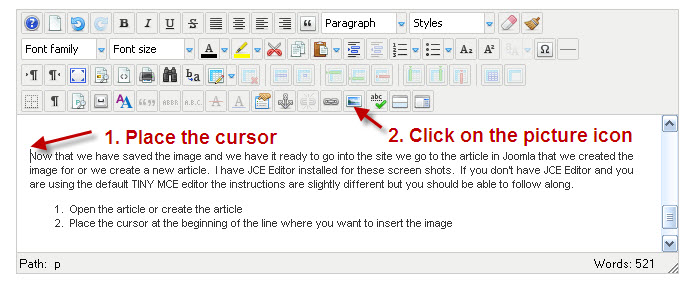
Now that we have saved the image and we have it ready to go into the site we go to the article in Joomla that we created the image for or we create a new article. I have JCE Editor installed for these screen shots. If you don’t have JCE Editor and you are using the default TINY MCE editor the instructions are slightly different but you should be able to follow along.
- Open the article or create the article
- Place the cursor at the beginning or end of the line where you want to insert the image (I entered this image at the end, then I clicked on the image and clicked the center button.

- When you click on the picture icon the image manager will pop up. In STEP 1, if you click on the image upload you will be given the option to browse your computer for the image to upload to the site or you can simply drag and drop the images into the upload area. Once you have selected all the images you want to upload, click upload. Then follow through the rest of the steps.


- Once you have the image onsite, you can further reduce the image but clicking directly on the image and dragging it bigger or smaller. You can also click the left, right or center justification to move the picture around. With the left and right justification options the text will flow around the image. If you find that the text is too close to the image then click on the image in the article and then click on the PICTURE icon up in the article toolbar.
There you have it. These are the basics on inserting and placing an image in an article on your Joomla website.

